Showing posts with label repurpose. Show all posts

Saturday, May 24, 2014

Stripping Tea Tins

I Love Metal, Concrete and the Smell of a Skunk!


I know that it's strange to claim to love metal, but I also love concrete and the scent of a good skunk.  I believe that skunks have gotten a bad rap.  They smell a little bit like rubber bands.  No one ever smells a box of rubber bands and exclaim "Ewwwwww!  I smell rubber bands!" I believe we have been conditioned to think that skunks stink.  A friend suggested that maybe we have Saturday morning cartoons to blame.  Who knows where the little critters got the bad reputation.  Back to the subject at hand--

I also love tea and enjoy collecting cute little metal tea tins.  Since I drink so much tea and I can't throw the tins away, I have more than I know what do with, which necessitates a brainstorming session with myself.  


Here is one of my favorite little cups that I found at Goodwill.  I hand wash it because I love it so much.  I also don't leave it outside for weeks.  I take a little cream  with my tea, making it look like coffee.  Coffee gags me, so tea is my coffee and I feel grownup when I drink my tea with cream.  I insist on drinking from a dainty little tea cup, especially on Saturday mornings.  I digress.  


Back to the Tea Tins.  I have been collecting these tins for some time and wanted to try stripping them of their paint and then repurposing them.  I could leave them as is, but they distract me.  They aren't cute.  Someone, I won't mention any names, insisted that stripping would not work and it would be a failed project.  I am always up for a good challenge, so I pulled out the big guns.


This was all I needed, plus some steel-wool, and wet sandpaper for the stubborn paint.  And a scraping thing--whatever that is called.  I think its called a scraper.  


I used an old paint brush and painted on the striper really super thick.  This particular tin started peeling pretty quickly.  The black tins were not as obedient, but some steel-wool and wet sandpaper helped.  Let the stripper set for a bit to begin eating the paint, but don't let it dry.  Try letting the stripper set for 10 or 15 minutes.  You may have to repeat the process.  


Stripper is powerful, so be sure to wear protective gloves.  In my estimation, the key here is to wear two left gloves.  It must be the secret to my super successful stripping.  I was told it couldn't be done!  Although the black paint was a bear, I stripped the heck out of these tins.  After the tins were mostly clean, I used a little steel wool and wet sandpaper.


I could have spent a little more time to get the black ones really clean, but I like the haunting look that the little paint evokes.  Plus, I am a Shabby Chic kind of girl.  


Splendid Trash

And there you have it!  Pretty tins that you can repurpose for so many things. Here are just a few ideas for your newly designed tins:

Q-Tips
Cotton Balls
Hair Ties
Matches
Craft Supplies
Sewing Supplies
Office Supplies
Chocolate Supplies
Tea Supplies
Money
Makeup
Pickles
Drugs

Just checking to see if you are still reading this post.  'Pickles' is a funny word and I wanted to wake you up.  Hello!  Please don't put pickles in your tin.  And please don't do drugs.

Now go repurpose something and make something useful!  Make some Splendid Trash!


Sunday, May 11, 2014

Glass Etching, Easy as Pie!

My Recycling Illness

I love Kombucha.  But O my, the stuff is expensive.   My co-worker bought me one as a treat and now I am doomed to drink the stuff until I die.  Good thing it's healthy, otherwise I would never forgive the girl who started this whole obsession.


So now that I have this habit, I figured out a way not to feel so guilty.  Yes, the bottle is glass and it can be recycled, but better yet, reuse it in a new and pretty way.

Have you ever tried glass etching?  

Glass etching is fun and easy.  I can even do it by myself and I usually need my husband to help with everything.  Etching makes me feel smart and creative.  And Happy!

Shopping List:
Etching Acid
Pen
Clear contact paper
Sharp exacto-knife
Tape
Small paint brush

Step One:

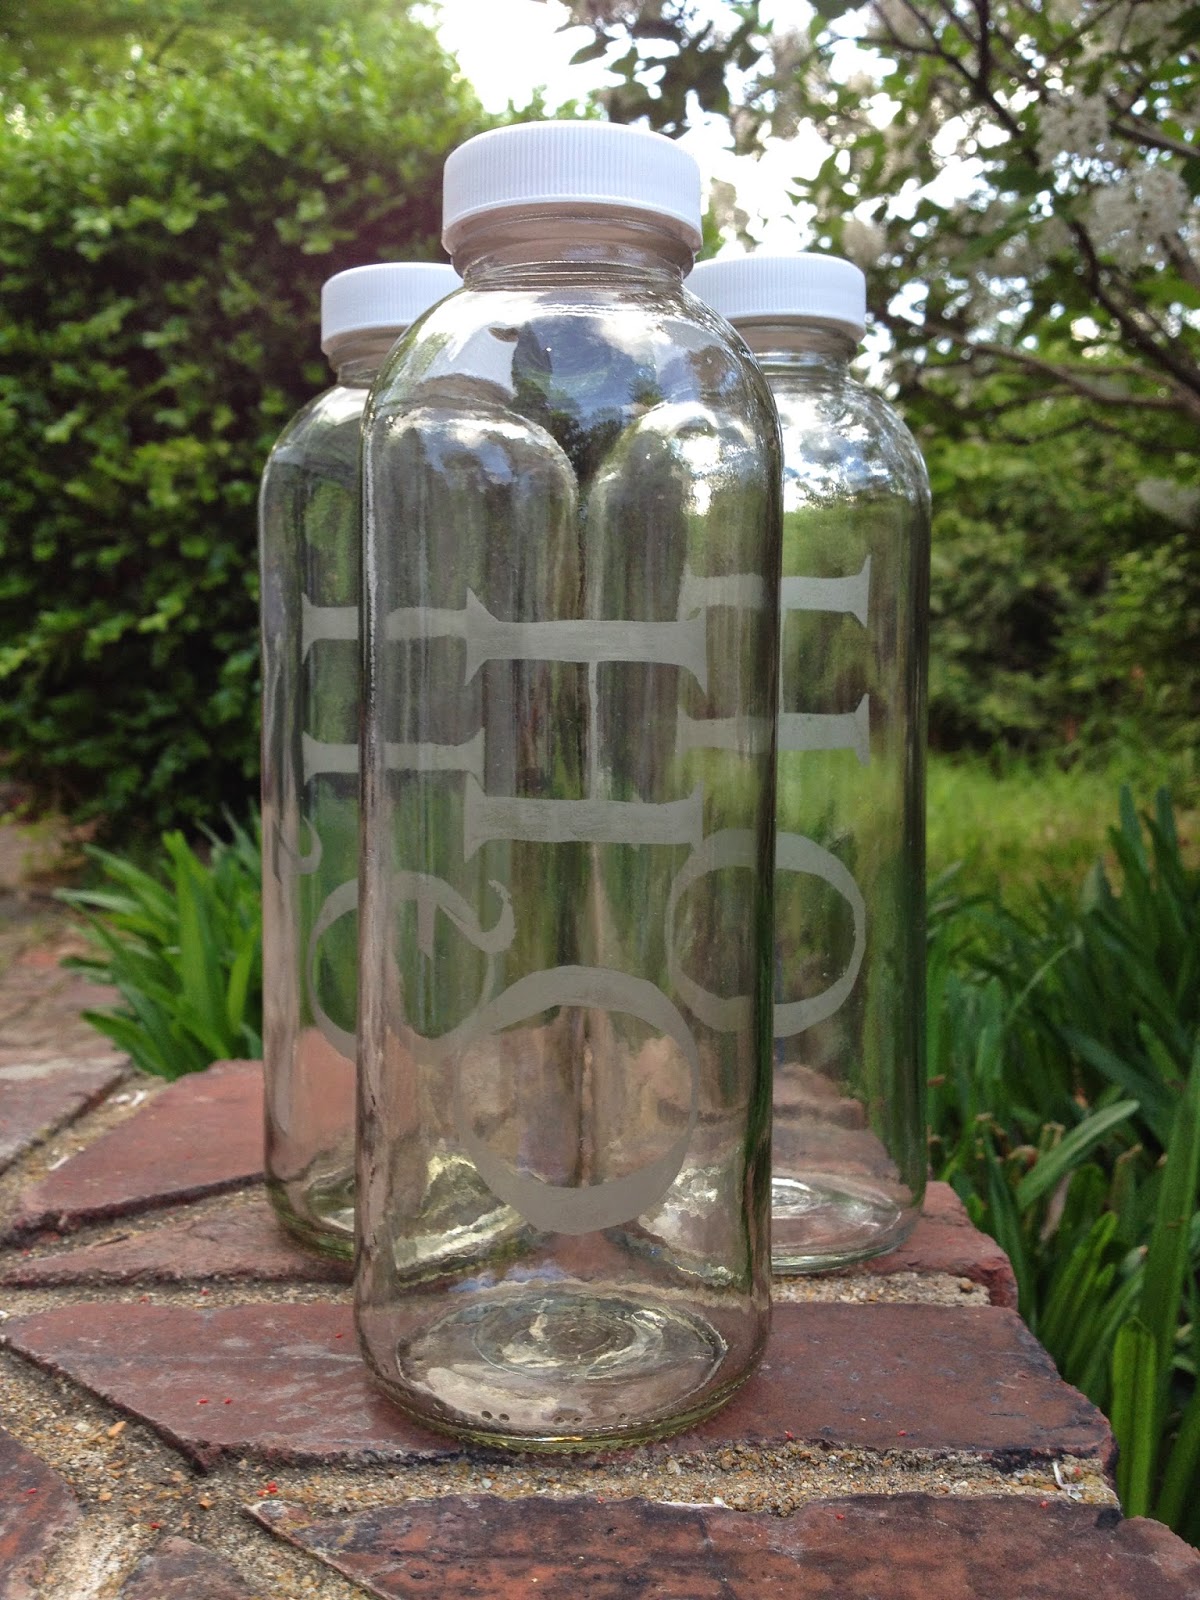
Choose a cute font and type the words or letters you want to etch.  You may have to experiment with the size or bold your text.  For my design, I chose the font Big Caslon, the size is 144 for the 'H' & 'O' and the '2' is size 96.  Testing fonts and sizing could take hours.  Soooo much fun!  Print your text.  You can also etch designs instead of text.  This is where you can really go crazy!


Step Two:  

Place the contact paper over the text and tape in place.  Trace with a non-smudgy pen--not a felt tip.  For this design you will have to move the contact paper to trace the '2' so that is lower.


Step Three:

Peel the contact paper backing and position on your glass bottle as desired.  Carefully smooth out all the bubbles.


Step Four:

With an exacto-knife, trace the pen lines, pressing firmly enough to cut in one, clean line.  In other words, you want it to be as straight as possible, not hacked.  I am not that great at this part, but you will improve with practice.  Don't fret, just do it!  Once you trace the letters, use the point of the blade to pick out the contact paper from inside the lettering.  If you missed a spot with the blade and it doesn't come out cleanly, recut the area instead of pulling and stretching the contact paper.


Step Five:

Paint on the etching acid and let sit for 10 minutes.  The bottle directions instruct 5 minutes, but we have found that 10 is better.  We also discovered that it's best to lay the bottle flat instead of up right.  This will prevent the acid from running onto the glass.


Step Six:

Rinse the acid off the bottle before removing the contact paper.


Step Seven:

Rejoice that you have have just created Splendid Trash!  We keep these babies filled with water, stocked in our fridge.  Water tastes better in a glass bottle labeled H2O.

Friday, March 15, 2013

The End of Toilet Paper Refill Stress

Have you missed me?  I am in Galveston, Texas visiting my daughter and her husband.

I have a little something that I can tell you about that might inspire you.  Once again, I didn't make it, but I commissioned Rick to make it.  He likes it when I do that.

We were presented with a problem, which may be relatible to you.


Refilling the toilet paper holder is a pain and a hassle.  Who wants to refill the roll when there are so many other important things to do.  Never mind that if you are sitting there with nothing else to do, you might as well make yourself useful.  It's called multitasking, people.


Is this a familiar scene at your home, toilet paper resting on top of the holder? Yep!  That's the style.
So, after much cajoling, I convinced my husband to make a really cool toilet paper holder out of pipes for our upstairs bathroom!  I love this pipe material, I don't know why.  It's very industrial, which I love.


The beauty of this baby is that the refill process is a no brainier.  Easy Peasy.


Admittedly, this is not desirable style for everyone.  It's not for the faint of heart, to be sure.  I like its rugged nature and 'here to stay' presence.  It's something a sheepherder could appreciate, or perhaps a extreme couponer.  Or maybe just me.  I like it, but if you insist, go to the Home Depot and get a one-step toilet paper holder to end the madness at your house.  This little project saved our marriage.


Thursday, February 21, 2013

Selling Crap on Craigslist Part 2

If you want to sell your crap on Craigslist, you need a good photo and a great description.  I tried to hawk this sweet little table last week to no avail.


Maybe the electrical outlet is too distracting.  I would give this photo a 'B'.  I also had a few close-ups attached to the ad.  My description went something like this:

Shabby Chic side table.  Features beautiful leather-like insert and a handy cubby for storing books, magazines or a basket.

I included the measurements and $30.00 cash price tag.

Not one bite!  I had multiple inquiries on the other side table and sold it right away.  So, I had two options.  One, lower the price.    Two, change the wording and try again.  I already had a lot invested with the walking next door in the dark and hauling it into the house.  Plus hiring my husband to paint it for free.  So you can understand why I had to charge the full 30 bucks.  The change I made to the ad was minimal:

Madmen meets Shabby Chic, side table.  Features beautiful leather-like insert and a handy cubby for storing books, magazines or a basket.

Boom! Four people wanted it!  Boom!


I just love selling crap on Craigslist!  My sister and I have an idea for selling chairs on Craigslist!  Coming soon!  


Saturday, February 16, 2013

Selling Crap on Craigslist

You know what I get a kick out of?  Finding something in the trash, fixing it up and then selling it on Craigslist.  It's so exciting!  Mystery, intrigue, danger, with a feel good ending!

Mystery
Why did someone throw away this little treasure?  It just needs a little TLC,  and elbow grease.  I love the smaller sized objects. You can quickly pull your vehicle over to the curb, swipe the discarded items and throw them in your trunk all before  the neighbors witness such low-level activity--or before they change their mind.  You wouldn't believe the cool stuff people throw away.


This little nightstand was missing a little piece of wood on the right lower corner and the drawer pull.  No big deal.  My 'before' picture could use a little more forethought and skill.  A true 'before' and 'after' would showcase the missing chunk of wood.  I should work on that, but imagine the worst.  


Intrigue
Neighbor looks out the window, sees me driving slowly by her house, stop, slowly backup and put the car in park.  I quickly get out and examine her discarded object, grab the nightstand, pop my trunk and throw it in, and zoom away.  She wonders, "What is that crazy neighbor doing with my trash again?  Now what on earth is she going to do with that broken, ugly o'l thang?  Maybe I should leave her a sandwich and aluminum cans."  Now, she is intrigued!


Suspense
What will it look like when it's finished?  Will anyone want it?  How much should we sell it for?  Or, should we keep it for ourselves?  Gift it?  What shall we do?  It's a nail biter!  A cliffhanger!


Danger
Everyone knows the stories of 'The Craigslist Killer' or the guy who robbed the fellow in a Craigslist scam.  It's a risky business to be involved in, especially in my hood!


A Feel Good Ending!


Friday, February 8, 2013

One Man's Trash....My Treasure!

One of the benefits of working in the fashion industry is attending the sample sales.  Oh, boy!  I can get in a lot of trouble at these events.  But, one area  of the sale that many bypass is the  fabric samples, which is understandable.  The pieces tend to be small or have huge chunks taken out of them.  But, they are FREE!  I love free stuff.  So, for some reason, I passed up this damaged little treasure, and it haunted me.  I thought about it for days.  The sale was over and there was nothing I could do about it.  I told my boss, described the piece and then she went out of her way to get it for me.  It helps to know people.

I love this blanket!  It's fuzzy on one side and quilted on the other side.  Hmmmm... I wonder what we can do with this 'trashed' blanket to make it a treasure.  Think, think, think!


My twin, Karri, and I decided to cut off the bad part using a straight edge and a rotary wheel and then bind  the raw edge.  We planned to give it to her daughter, Karra, so we chose a black and white floral fabric that she would like.


Binding a raw edge is super fun and easy.  Here's how:


Iron out the wrinkles.  It's important!  Trust me!


Measure the raw edge of the blanket and add a couple inches.  If your fabric is not long enough, you can sew strips together.  It's always better to make your strip a lot longer than the edge you want to bind.  


Place the strips, right sides facing each other in the shape of an 'L'.  Sew diagonally to the other edge.


Cut the excess fabric about 1/4 inch or less from the stitching.  


Press open the seam.  You could just sew the two pieces end to end, but this method will eliminate some of the bulk.  Trust me, it will look a whole lot more professional.


Fold the strip of fabric, lengthwise, wrong sides together and press.  


To avoid a raw edge, unfold the fabric, and iron a hem about 1/4 inch.  Then you fold it back, wrong sides together again and press again.
Now you are ready to attach the binding to the blanket.


Place the raw edges together, starting with the end that you just ironed that little 1/4 inch hem.  I like to use the edge of my presser foot as the guide for my seam allowance.  Your seam allowance need not be wide (less bulk).  Sew as straight as possible!  You can pin in place if you need help holding it all together.


When you get close to the end, fold in another 1/4 inch hem (but don't worry about ironing it) making sure that the edges are even.  Finish sewing to the end and back stitch to lock your stitches in place.  Now the binding is attached to the blanket. Yay!  


Press the binding toward the raw edge.  The next part is my favorite!  Hand sewing!  


Fold the binding over to cover the raw edge.  Use the line you stitched as your guide.  You may pin in place, but I find that they get in the way.  Use the hidden stitch to attach.  If you don't know how to do the hidden stitch, google it.  There are a ton of tutorials out there.  


This almost landed in the trash, but now it's a treasure!  I am happy with how you don't see much of the floral, making it modern and funky.  


Next Up:


What should we do with this leftover fabric?  Throw it away!  Have you learned nothing, Grasshopper?