Thursday, February 21, 2013

Selling Crap on Craigslist Part 2

If you want to sell your crap on Craigslist, you need a good photo and a great description.  I tried to hawk this sweet little table last week to no avail.


Maybe the electrical outlet is too distracting.  I would give this photo a 'B'.  I also had a few close-ups attached to the ad.  My description went something like this:

Shabby Chic side table.  Features beautiful leather-like insert and a handy cubby for storing books, magazines or a basket.

I included the measurements and $30.00 cash price tag.

Not one bite!  I had multiple inquiries on the other side table and sold it right away.  So, I had two options.  One, lower the price.    Two, change the wording and try again.  I already had a lot invested with the walking next door in the dark and hauling it into the house.  Plus hiring my husband to paint it for free.  So you can understand why I had to charge the full 30 bucks.  The change I made to the ad was minimal:

Madmen meets Shabby Chic, side table.  Features beautiful leather-like insert and a handy cubby for storing books, magazines or a basket.

Boom! Four people wanted it!  Boom!


I just love selling crap on Craigslist!  My sister and I have an idea for selling chairs on Craigslist!  Coming soon!  


Saturday, February 16, 2013

Selling Crap on Craigslist

You know what I get a kick out of?  Finding something in the trash, fixing it up and then selling it on Craigslist.  It's so exciting!  Mystery, intrigue, danger, with a feel good ending!

Mystery
Why did someone throw away this little treasure?  It just needs a little TLC,  and elbow grease.  I love the smaller sized objects. You can quickly pull your vehicle over to the curb, swipe the discarded items and throw them in your trunk all before  the neighbors witness such low-level activity--or before they change their mind.  You wouldn't believe the cool stuff people throw away.


This little nightstand was missing a little piece of wood on the right lower corner and the drawer pull.  No big deal.  My 'before' picture could use a little more forethought and skill.  A true 'before' and 'after' would showcase the missing chunk of wood.  I should work on that, but imagine the worst.  


Intrigue
Neighbor looks out the window, sees me driving slowly by her house, stop, slowly backup and put the car in park.  I quickly get out and examine her discarded object, grab the nightstand, pop my trunk and throw it in, and zoom away.  She wonders, "What is that crazy neighbor doing with my trash again?  Now what on earth is she going to do with that broken, ugly o'l thang?  Maybe I should leave her a sandwich and aluminum cans."  Now, she is intrigued!


Suspense
What will it look like when it's finished?  Will anyone want it?  How much should we sell it for?  Or, should we keep it for ourselves?  Gift it?  What shall we do?  It's a nail biter!  A cliffhanger!


Danger
Everyone knows the stories of 'The Craigslist Killer' or the guy who robbed the fellow in a Craigslist scam.  It's a risky business to be involved in, especially in my hood!


A Feel Good Ending!


Friday, February 8, 2013

One Man's Trash....My Treasure!

One of the benefits of working in the fashion industry is attending the sample sales.  Oh, boy!  I can get in a lot of trouble at these events.  But, one area  of the sale that many bypass is the  fabric samples, which is understandable.  The pieces tend to be small or have huge chunks taken out of them.  But, they are FREE!  I love free stuff.  So, for some reason, I passed up this damaged little treasure, and it haunted me.  I thought about it for days.  The sale was over and there was nothing I could do about it.  I told my boss, described the piece and then she went out of her way to get it for me.  It helps to know people.

I love this blanket!  It's fuzzy on one side and quilted on the other side.  Hmmmm... I wonder what we can do with this 'trashed' blanket to make it a treasure.  Think, think, think!


My twin, Karri, and I decided to cut off the bad part using a straight edge and a rotary wheel and then bind  the raw edge.  We planned to give it to her daughter, Karra, so we chose a black and white floral fabric that she would like.


Binding a raw edge is super fun and easy.  Here's how:


Iron out the wrinkles.  It's important!  Trust me!


Measure the raw edge of the blanket and add a couple inches.  If your fabric is not long enough, you can sew strips together.  It's always better to make your strip a lot longer than the edge you want to bind.  


Place the strips, right sides facing each other in the shape of an 'L'.  Sew diagonally to the other edge.


Cut the excess fabric about 1/4 inch or less from the stitching.  


Press open the seam.  You could just sew the two pieces end to end, but this method will eliminate some of the bulk.  Trust me, it will look a whole lot more professional.


Fold the strip of fabric, lengthwise, wrong sides together and press.  


To avoid a raw edge, unfold the fabric, and iron a hem about 1/4 inch.  Then you fold it back, wrong sides together again and press again.
Now you are ready to attach the binding to the blanket.


Place the raw edges together, starting with the end that you just ironed that little 1/4 inch hem.  I like to use the edge of my presser foot as the guide for my seam allowance.  Your seam allowance need not be wide (less bulk).  Sew as straight as possible!  You can pin in place if you need help holding it all together.


When you get close to the end, fold in another 1/4 inch hem (but don't worry about ironing it) making sure that the edges are even.  Finish sewing to the end and back stitch to lock your stitches in place.  Now the binding is attached to the blanket. Yay!  


Press the binding toward the raw edge.  The next part is my favorite!  Hand sewing!  


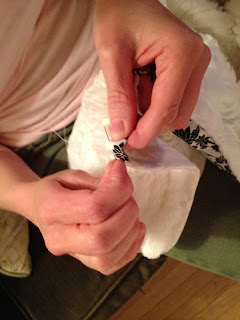
Fold the binding over to cover the raw edge.  Use the line you stitched as your guide.  You may pin in place, but I find that they get in the way.  Use the hidden stitch to attach.  If you don't know how to do the hidden stitch, google it.  There are a ton of tutorials out there.  


This almost landed in the trash, but now it's a treasure!  I am happy with how you don't see much of the floral, making it modern and funky.  


Next Up:


What should we do with this leftover fabric?  Throw it away!  Have you learned nothing, Grasshopper?


Saturday, February 2, 2013

Recycled Food

Plan ahead, and you will save money and calories.  One simple thing you can do is prepare your lunches at the beginning of your work week.  This is just one sample of my meals for the week, less Friday.


I will come up with something later in the week for Friday's meal.  I cheated this week, but that's ok.  It just so happens that a lot of what you see is leftovers from San Sai, one of my favorite fast food places.  I totally recycled my leftover lunch and made enough lunches to almost get me through the week.  The far left jar contains some of the leftover salad with the addition of fresh lettuce of my own.  Notice  the bits of pasta, corn and other colorful veggies topped with greens.  On top of that, I added some cashews to give myself a protein boost.  The small jar on top of the salad holds cauliflower puree, which tricks the brain into thinking that you are eating mashed potatoes.  With this particular batch I added some fresh garlic sauteed in a little olive oil, salt and fresh ground pepper.  You may also add potatoes, just remember to use more cauliflower than potatoes to lower your carbohydrate intake.  This batch only contained one potato and an entire head of cauliflower.  Everyone loves this, including kids, provided you tell them after they eat the 'mashed potatoes'.  We faked a lot of people out a couple of Thanksgivings ago and now they request that we bring the 'potatoes'!  I'm such a liar!

The next few jars contain brown rice and spicy chicken from San Sai.  I will pair this with homemade roasted zucchini.  Roasting vegetables is one way to pack more flavor without added caloric filled sauces.  Simply toss veggies with olive oil to coat, add some herbs, pepper and maybe some balsamic vinegar.  Roasting veggies will be your new love! 


The remainder of the white jars are filled with Honey Greek Yogurt, from Trader Joes.  I proclaim it is the best yogurt on the planet.  You can add your own fresh or frozen fruit or simply eat it plain.  Yum!!!  It is so much more economical than buying individual servings, and less sugar laden.  Warning:  4oz is plenty for a serving.  It has a tad more fat than I would prefer, but it's worth it!

The benefits of using Mason Jars are numerous.  It helps with portion control, cuts down on plastic, and looks pretty!  I believe that aesthetics are very important, especially when eating.  And sleeping.  And living. Mason Jars are easy to transport to work and take up very little space.  You may want to bring a bowl or plate to work, but for some of these you can eat right out of the jar.  They are also easy to clean, however, I wash the lids by hand so as to keep rust at bay. 

Doesn't this look yummy?  And to think how far I stretched this meal into the work week.  You don't have to deprive yourself of tasty food or never go out to eat in order to eat healthy.  This meal was tasty and satisfying. 


Bon Appetit!